Chapter 9 — Scheduling
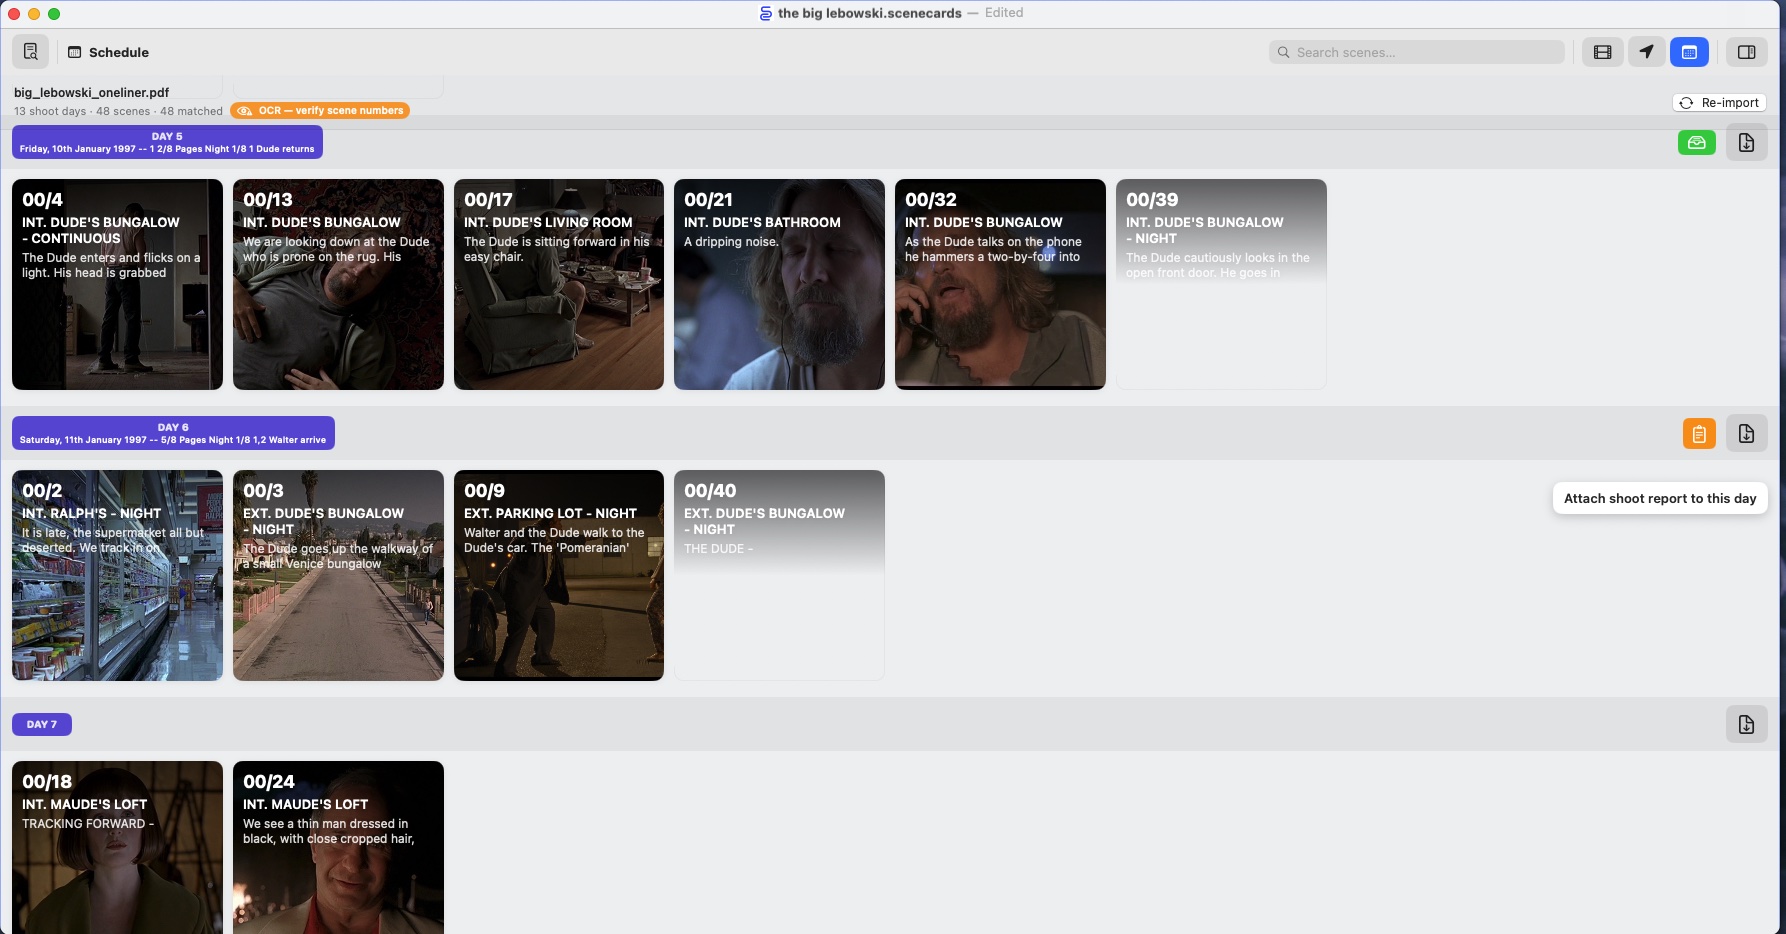
Schedule mode reorganises the wall into shoot days drawn from an imported one-liner PDF. Instead of script order, you see each day’s scenes as a grid of cards — with crew call, total pages and report badges in the day header. Call sheets, sound, camera and continuity reports can all be attached per day (§9.6), and a tidy Unmatched section at the bottom catches any cards not yet accounted for.
This chapter covers switching into Schedule mode, importing and re-importing the one-liner, how cards are matched to schedule entries, moving cards between days, multi-select, and what the various badge colours mean. Attaching sound, camera and continuity reports to a day is in §10.
9.1 Switching to Schedule Mode
Three routes reach Schedule mode:
| Route | Action |
|---|---|
| Toolbar | Tap or click the Schedule segment |
| Keyboard | ⌘⇧3 |
| Menu | View → Schedule |
⌘⇧1 and ⌘⇧2 return to Scenes and Locations respectively.
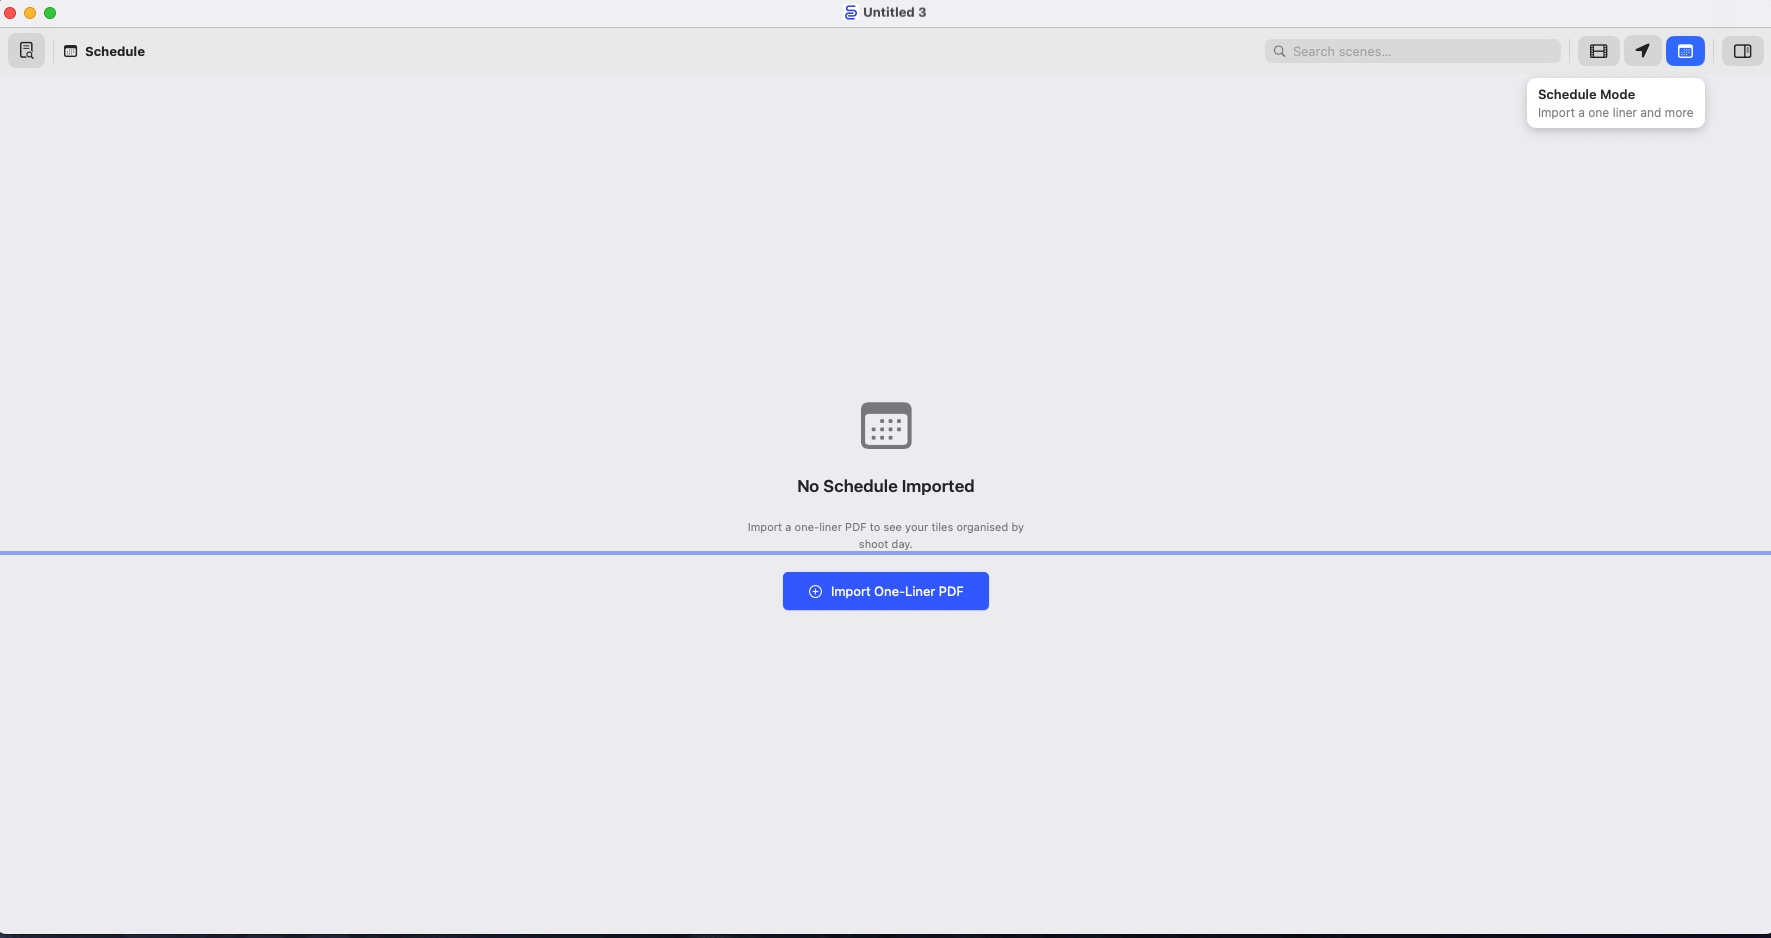
Without an imported one-liner, Schedule mode shows an empty state with a single Import One-Liner PDF button. Once a schedule is loaded, the full day-by-day view appears.
9.2 Importing a One-Liner
The one-liner is the shoot schedule — a PDF strip board that lists scenes grouped by shoot day, with crew call times and page counts. Scene Cards reads the PDF and builds the day structure automatically.
9.2.1 First import
- Switch to Schedule mode.
- Tap or click Import One-Liner PDF in the centre of the screen.
- Select the PDF from the file picker and click Open.
Scene Cards scans the first few pages of the PDF and auto-detects the
scene number format — dot (2.14), dash (2-14), slash (2/14), or
film (bare numbers like 14, 103A). In most cases the detection is
confident and parsing begins immediately.
If the format is ambiguous — for example, the PDF contains a similar number of dot-separated and slash-separated patterns — a Scene Number Format picker appears. Each option shows the number of matching patterns found in the PDF (e.g. “8 found”), so you can make an informed choice without going back to open the file. Select the row for the separator your schedule uses between episode and scene number — or Auto-detect to let Scene Cards make a best guess — then click Import.
Scene Cards then parses the full PDF, matches each scene number against the cards on your wall, and populates the schedule. A progress indicator appears while parsing runs.
9.2.2 Importing a second schedule — Merge or Replace
When a schedule is already loaded and you click Import New Schedule in the top bar, a dialog asks how to handle the incoming schedule:
| Option | What it does |
|---|---|
| Merge | Days with matching day numbers are updated from the new PDF. Days that exist only in the new PDF are added. Days that exist only in the current schedule are left unchanged. All attached shoot reports survive. |
| Replace | The current schedule is discarded entirely and replaced with the new PDF. Manual day assignments are lost. |
| Cancel | Nothing changes. |
Use Merge when a revised strip board has been issued for some shoot days and you want to carry forward reports already attached to unchanged days. Use Replace when the entire schedule has been restructured.
ⓘ Note — manual day assignments (the orange-badge overrides, §9.5) are stored by card, not by day. Merge preserves them; Replace removes them along with the schedule.
9.2.3 OCR warning
When the one-liner is a scanned image PDF rather than a text PDF, Scene Cards falls back to OCR to extract the scene numbers. An orange OCR — verify scene numbers badge appears in the top bar. Check the Unmatched section (§9.4.3) after import and manually assign any cards that landed incorrectly.
✱ Tip — if a schedule imports badly (scenes missing, or scenes appearing on the wrong day), 🍎 File → Export Schedule Import Diagnostic… writes out exactly what the parser read from the PDF, including the OCR text. Sending that file alongside a description of what you expected makes the problem reproducible without needing the schedule itself re-run. A long schedule takes a few minutes to export because it re-runs OCR; the progress toast counts the pages.
The same report also covers the cast side, so it’s the thing to send if a character is missing from Cast mode: it lists the cast list it read from page 1, the cast numbers it found for each scene, and the scenes where it found none — those last ones are worth checking against the PDF, since a blank cast column is normal and looks the same in the report as a column it failed to read.
9.3 The Schedule Top Bar
When a schedule is loaded, a persistent bar appears at the top of Schedule mode showing:
- Source filename — the name of the imported PDF.
- Day / scene / match counts — e.g.
12 shoot days · 87 scenes · 84 matched. - OCR badge — orange, when OCR was used (§9.2.3).
- Import New Schedule button — imports another PDF, offering Merge or Replace (§9.2.2).
9.4 Reading the Day View
9.4.1 Day header
Each shoot day opens with an indigo DAY N badge. The badge also shows the date and crew call when the one-liner carries them. To the right:
| Element | Meaning |
|---|---|
| 🟢 Cast badge | Sorted list of cast numbers for the day (green, when the one-liner includes cast columns). Tap it to see each number resolved to a name — see below |
| 🗒 Total pages | Page count for the day |
| ⚠ N unmatched | Scenes in the one-liner with no matching card |
| Report badges | Colour-coded icons for attached reports (§9.6) |
| ↓doc button | Opens the Attach Report menu for this day (§10) |
Cast numbers, named. Every one-liner schedule’s first page is a “CAST MEMBERS” list — a cast number next to each character’s name. Scene Cards parses that page automatically on import and remembers it with the document, so tapping the cast badge on any day shows each number next to the name it resolves to, instead of just the bare numbers. This is a best-effort read of the page, the same way OCR schedule import is (§9.2.3) — most names come through correctly, but on a dense, multi-column cast list a few can end up attached to the wrong number. Worth a glance the first time you use it; a wrong name is easy to fix by re-importing a corrected schedule, or by using Cast mode’s Merge/Hide tools (§3.2) if it’s already been pulled into a Cast-mode group. If a schedule was imported before this existed, or its first page isn’t a recognisable cast list, the badge still works — it just shows numbers with no names until you re-import that schedule PDF. Cast numbers in the 1-100 range (the main/speaking-cast band on a typical UK schedule) also feed Cast mode (§3.2) directly, so a character who’s in scenes but never speaks can still get their own group there without being added by hand.
ⓘ Note — putting cast numbers against individual scenes (rather than against the day as a whole) is done by reading the schedule’s cast column by its position on the page. That needs a PDF containing real text. If your schedule is a scan — an image of a page, which Scene Cards has to read with OCR — the day badge still names its cast, but per-scene cast numbers aren’t filled in and Cast mode falls back to characters detected from dialogue. A schedule exported straight from Movie Magic, Yamdu, Scenechronize or similar is normally real text; one that’s been printed and scanned, or photographed, is not.
9.4.2 Scene cards
Cards that matched a schedule entry appear as full tiles — still image (if one has been attached), scene number, heading and action. They behave the same as on the wall: tap to select, double-tap to open the inspector.
If a scene number appears in more than one shoot day in the one-liner (a long scene split across two days), the card appears as a full tile in each of those days — it is not deduplicated. This is the intended behaviour; the same scene genuinely belongs to both days.
Small badges in the top-right corner of a card:
| Badge | Meaning |
|---|---|
| 🖐 Orange hand | Card has been manually assigned to this day (§9.5) |
| 〰 Cyan waveform | Manual assignment AND sound report data exists for this day |
| ⬤ Coloured dot | Revision colour from the script (§5.5) |
9.4.3 Placeholder cards
Scenes from the one-liner that have no matching card on the wall appear as placeholder tiles — dashed border, greyed text, orange ? badge. They carry the scene number, set and one-liner description from the PDF.
Placeholders are read-only. To turn a placeholder into a real card, import the script and make sure the scene number matches, or manually create a card and assign it to the day (§9.5).
9.4.4 Unmatched tiles section
Cards on the wall that appear in no shoot day — neither by schedule match nor by manual assignment — collect in an Unmatched Tiles strip at the bottom of the schedule. The orange header shows the count.
Assign an unmatched card to a day by right-clicking it (🍎 macOS) or long-pressing it (📐 iPadOS) and choosing a shoot day from the menu, or by dragging it onto a day section (§9.5.2).
9.5 Moving Cards Between Days
9.5.1 Context menu
Right-click a card (🍎 macOS) or long-press a card (📐 iPadOS) to open the context menu:
| Option | What it does |
|---|---|
| Move This Tile to Shoot Day… | Reassigns this one card to the chosen day |
| Move This and All Below to Shoot Day… | Reassigns this card and every card below it in the current day’s order |
| Clear Manual Assignment | Removes the override; card reverts to schedule matching |
| Remove from Schedule | Removes this scene entry from the day entirely (card stays on wall) |
Move N Selected Tiles to Shoot Day… replaces the single-tile option when multiple cards are selected (§9.5.4).
9.5.2 Drag to a day
Drag any card and drop it onto a different day section. The day highlights in blue while you hold the card over it. Release to assign. You can drag a multi-selection this way — all selected cards move together.
9.5.3 Clear a manual assignment
A manually assigned card stays on the chosen day even if a new one-liner is imported that would put it elsewhere. To revert to schedule-driven placement, right-click → Clear Manual Assignment.
9.5.4 Multi-select and bulk move
To move several cards at once:
🍎 macOS:
- ⌘-click individual cards to toggle them.
- Shift-click to extend the selection to a range.
📐 iPadOS:
- Tap one card to select it, then tap others to add them.
A selection bar appears at the top of the schedule showing the count and a Move to Shoot Day… menu. Choose a day to move all selected cards in one step. The selection bar also has an ✕ button to deselect all.
✱ Tip — use Move This and All Below to Shoot Day… from the context menu to quickly slide a block of scenes from one day to another without selecting them individually.
9.6 Report Badges
Each day header can show up to one badge per report type. Badges are added when you attach a shoot report (§10); they give a quick visual status of what has been imported for each day.
| Badge | Report type |
|---|---|
| 🩵 Teal | Sound |
| 🔵 Indigo | Camera |
| 🟠 Orange | Continuity |
| 🟣 Purple | Call Sheet |
| 🟢 Green | Essentials |
Tap or click a badge to open the attached file. On 📐 iPadOS a QuickLook preview opens; on 🍎 macOS the file opens in the system default app.
Right-click a badge for a context menu with Open and Remove options. Removing a badge deletes the report attachment record from the document (the file inside the package is not deleted).
9.7 Searching in Schedule Mode
The search bar filters the day view in real time. Matching is across:
- Scene number (e.g.
14,14b,1/14,01-14) - Set description
- One-liner text
- Card heading and action text
Type 1/14 or 01-14 to find scene 14 in episode 1 specifically.
Days that have no matching scenes are hidden while the search is active.
The Unmatched section is also filtered.
Clear the search to return to the full schedule view.
9.8 How Matching Works
Scene Cards matches each schedule entry to a card using normalised scene numbers:
- TV format —
ep-scenee.g.01-14,1-14a. Matches a card whosesceneDisplaynormalises to the same string. - Film format — bare scene number e.g.
14,14A. Matches any card with that scene number across all episodes.
Normalisation strips leading zeros, converts separators (/, .) to
dashes, and removes part labels (pt1, pt2). The match is
case-insensitive.
A card that has been manually assigned to a day (§9.5) always appears on that day regardless of what the one-liner says. In the day where the schedule originally placed it, the slot shows as a placeholder until the manual assignment is cleared.
A scene that appears in two shoot days in the one-liner (split scene) renders as a full card in both days with no manual action needed. The Unmatched section at the bottom correctly excludes it.
9.9 Persistence
The imported schedule and all manual day assignments are saved inside the document:
- The
OneLinerSchedule(shoot days, scene entries, date strings) is stored inpayload.jsonalongside the wall state. - Manual assignments (
manualScheduleDay) are stored in the wall state and survive script re-imports (§5.1.2). - Report attachment records are stored in the wall state; the report
files themselves live in
Media/reports/Day_NN_DDMMYY/{type}/(§10.7).
Opening the document on another machine restores the full schedule view without re-importing the PDF.
9.10 Where to Go Next
- Attach sound, camera and continuity reports — see §10 Shoot Reports.
- Print the wall — Schedule mode is not currently printable; use Scenes mode for printing. See §11.
- Multi-episode scene numbers — see §13 Multi-Episode.
- Switching between wall modes — keyboard shortcuts in §16.