Chapter 6 — Working with Scenes
This chapter covers the per-scene edits you make inside the Inspector panel, and one task that lives in the Script Panel: character colour assignment. Wall-level operations (insert, reorder, omit, delete, renumber) live in §5; stills and references each have their own chapter (§7 and §8).
The Inspector
6.1 Opening the Inspector
Select one card and open the inspector:
- 🍎 macOS — double-click the card, or click the Inspector button in the toolbar.
- 📐 iPadOS — double-tap the card, or tap the Inspector button in the toolbar.
With no card selected, the inspector reads “Select a tile to edit.” With more than one card selected, it switches to the Multi-Select Panel (§6.8).
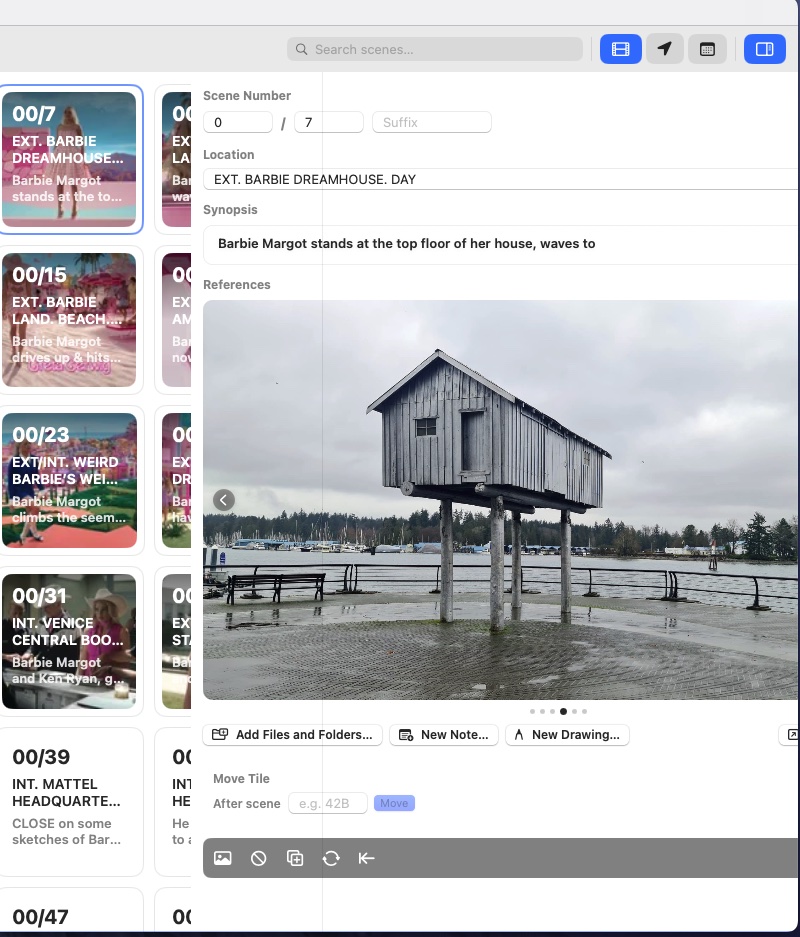
Edits are committed as soon as a field loses focus — there is no Save
button. Each commit is a single undo step (⌘Z).
6.2 Scene Numbering
The Scene Number block sits at the top of the inspector. It is three
text fields joined by a / separator:
[ Episode ] / [ Scene ] [ Suffix ]
- Episode — integer (
1,101…). - Scene — integer.
- Suffix — optional string (
A,B,AA…). Auto-uppercased when you commit.
Editing any of the three rewrites the card’s identity. Numbering is independent from slot order, so changing the number does not move the card; to resync numbering with the wall order, use Renumber From Here (§5.4.2).
ⓘ Note — two cards can legally share a number if one of them uses a suffix (
7and7A). Two cards with the exact sameepisode + scene + suffixcombination is not prevented but is a symptom of a broken import — fix it before it confuses the merge logic on the next re-import (§5.1.2).
6.3 Location
The Location field holds the slugline — the text after INT. /
EXT. in the scene heading.
- Auto-uppercased as you type.
- Autocorrect is disabled — sluglines routinely use abbreviations and proper nouns that spellcheck would mangle.
- In Locations mode (§3.2), cards are grouped by this exact string.
Typos create new groups, so be consistent:
INT. OFFICEandINT.OFFICEare different locations.
✱ Tip — after a script re-import, location strings are overwritten with the new draft’s values (§5.1.2). Let the importer set them; manual edits are erased on the next merge.
6.4 Action
The Action field is a free-form multi-line text editor. It shows on the wall as the card’s secondary text and survives re-imports untouched (unlike the heading fields in §6.3).
What goes in Action is up to you — some productions put:
- A dramaturgical beat (the “what happens” of the scene).
- The director’s shot intent for that day.
- A reminder about character intent or continuity.
On a fresh import from a PDF, the first action line of each scene is pre-filled here as a starting point — edit or clear it as you like. Cards display up to four lines of action text; the field itself has no length limit.
ⓘ Note — the inspector calls this field Action; in earlier builds it was labelled Synopsis and before that Comments. All three terms refer to the same underlying data (
tile.commentsin the file format — see §18).
6.4.1 Editing the heading and action from the script panel
The scene heading and action can also be edited without leaving the script panel. Tap Edit in the panel — two pinned rows appear above the script body:
- Scene Heading — the card’s full scene heading (e.g.
INT. OFFICE — DAY). This is the heading shown on the card in every wall mode and on the printed wall. - Action — the same field as the inspector’s Action editor.
Changes commit when the field loses focus or you tap Done, and are reflected immediately in the inspector, on the wall tiles, and in print. Both rows are disabled for OMITTED scenes.
Two rules keep this predictable:
- Location is never touched. The inspector’s Location field (which drives Locations-mode grouping) stays exactly as it was — editing the heading cannot regroup the wall or detach location attachments. If the location genuinely changed, update it in the inspector.
- Manual headings survive re-import. A heading edited here is flagged, and a later script re-import keeps your version instead of overwriting it with the draft’s heading (the merge summary reports how many were kept). The one exception: if the scene becomes OMITTED in the new draft, the script wins. Action text survives re-import regardless, as it always has.
6.5 Moving a Card to a Specific Scene
The Move Tile panel sits beneath the references carousel. It repositions this card after another card, looked up by scene number.
- Type a scene number into the Move Tile After Scene field
(e.g.
42B). - As you type, matching scenes appear as chips below the field — tap a chip to move there directly, or press Move to use the typed number.
If the target is found, the card hops to the slot immediately after it and a green confirmation appears for a couple of seconds. If the scene number does not exist in the document, you’ll see “Scene X not found” and nothing changes.
The target scene can be in any episode — Scene Cards searches the whole document. This is the fastest way to reposition a card across a large wall without dragging through hundreds of slots.
6.6 The Inspector Toolbar Strip
Under the references carousel sits a strip of icon buttons. All of them act on the currently selected card.
| Icon | Action | Detail |
|---|---|---|
| 🖼 | Import Image | Opens the image picker to set a still on this card (§7.2). |
| 🚫 | Remove Image | Removes the card’s hero still. Only shown when the card has one. |
| 👁 | Omit / Unomit | Toggles OMITTED. Clears any suffix when turning omit ON (§5.5). |
| + | Insert Tile After | Adds a blank card in the slot after this one (§5.2). |
| 🔄 | Renumber From Here | Walks the wall from this card onward and re-issues scene numbers (§5.4.2). |
| ← | Close Gap | Pulls every later card up one slot (§5.3.3). |
| 🗑 | Delete | Permanently removes the card and its attached media. Requires confirmation. |
⚠ Caution — Delete cannot be undone once the document is saved and closed. Use Omit for any scene that might come back.
6.7 Shoot Data
When a card carries at least one sound report entry, a Shoot Data block appears between the toolbar and the bottom of the inspector.
Each row summarises one report type on one shoot day:
🎧 Sound · Day 04 · 6 takes [▾]
Tap or click the row to expand it and see every entry — slate, take, wild-track flag, timecode, notes. Collapse again by tapping the row a second time.
Shoot Data is read-only inside the inspector; entries are added through the shoot-report import flow (§10.2).
ⓘ Note — at present, only Sound reports populate Shoot Data. Camera and continuity reports are stored as day-level attachments rather than parsed entries (§10.3).
6.8 Editing Multiple Cards at Once
Select two or more cards (§3.6.1) and the inspector switches to the Multi-Select Panel:
- Header —
N tiles selectedwith a stack icon. - Scene list — a horizontal strip of the selected cards’ scene numbers, so you can double-check what’s in the selection.
- Move Block After Scene — type a target scene number and press Move Block to insert the whole selection, in its current order, immediately after that scene.
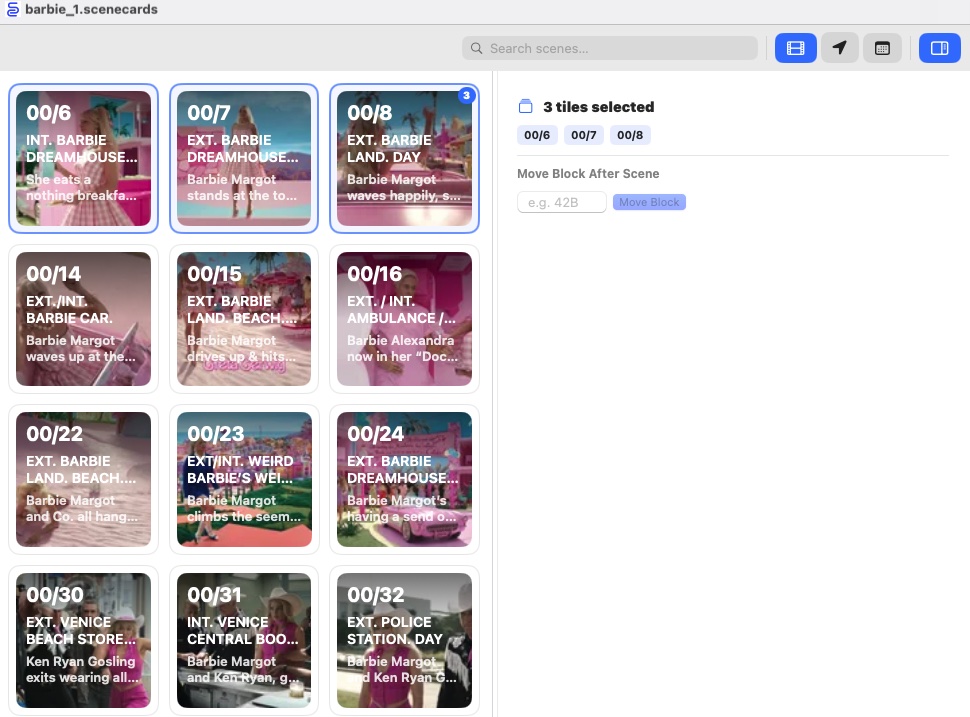
Nothing else can be edited in multi-select — per-scene fields (location, action, scene number) require a single selection, since they take different values on every card.
ⓘ Note — the target scene must be outside the selection. Moving a block onto one of its own cards is rejected with “Target is inside the selection”.
The Script Panel
6.9 Character Colours
The Script Panel (§3.5) shows the raw text extracted from the script PDF. It doubles as the interface for assigning colours to characters — open it with the 🔍 button on iPadOS, or via the left sidebar toggle on macOS.
When a script title is detected on the title page of the imported PDF (a line that contains “Script” alongside an episode marker, revision colour, or date), it is shown in italics in the navigation bar above the script text — for example, GKH4 Ep 1 Yellow Script - 29.9.21. This is read-only; to change the title, re-import a revised draft.
- Click (🍎) or tap (📐) a character name in the script panel to open a colour popover.
- Pick a colour; the cue recolours across every scene that character speaks in.
- To clear a character’s colour, reopen the popover and tap Remove.
The character list here — and Cast mode’s grouping — is built by scanning dialogue cues, so a character who’s present in a scene but never speaks (or is only referred to by someone else) won’t show up on its own. Use Add character to this scene… at the bottom of the Characters panel to add them by hand; this only affects the currently open scene, and the name gets a badge marked added so it’s clear it wasn’t detected from the script. Removing a manually-added name (✕) takes it out of just this scene — unlike removing a detected name, it doesn’t exclude it document-wide.
Two kinds of colour are in play:
| Type | Persistence | Who sets it |
|---|---|---|
| Manual | Saved in the document | You — always wins when both are present |
| Auto | Session only, never saved | Scene Cards, when a character appears in the currently selected scene |
Auto colours keep the script readable even before you’ve named each character; manual colours override them when you want something specific.
✱ Tip — a character removed via Remove stays excluded: auto- population will not re-add them. Reopen the popover and pick a colour to bring them back into rotation.
✱ Tip — this same exclusion list is shared with Cast mode (§3.2), which groups the wall by character. Hiding a mis-detected “character” from either place hides it in both.
6.10 What the Inspector Does Not Edit
A deliberately short list so you stop looking:
- Revision colour — set by the script importer only (§5.7).
- Raw script text — set by the importer; viewed in the Script Panel (§3.5) but not editable there either.
- Scene heading / slugline as it appears on the card (the big text under the scene number) — also set by the importer.
Everything on the list arrives from the PDF or FDX. To change any of them, bring in a revised draft (§5.1).
6.11 Where to Go Next
- Rearrange the wall — see §5.
- Attach a still — see §7.
- Attach references — see §8.
- Add a shoot report — see §10.
- Schedule a card onto a day — see §9.