Chapter 3 — Orientation
This chapter is a guided tour of the Scene Cards window. Once you have a document open (Chapter 2), everything you do happens inside one of four regions: the toolbar, the wall, the inspector and the script panel.
This chapter describes the interface only. Procedures (importing, reordering, scheduling) live in their own chapters and are cross-referenced from here.
3.1 The Anatomy of the Window
Every Scene Cards document opens into a three-zone layout:
| Zone | Contents | Platform notes |
|---|---|---|
| Toolbar (top) | Mode switcher, search, script / inspector toggles | Inline on both platforms |
| Wall (centre) | The grid of cards — the primary work surface | Same on both platforms |
| Inspector (right) | Editable details of the selected card | Docked on macOS; sheet on iPadOS |
| Script panel (left) | The raw script for the selected card | Docked on macOS; bottom panel on iPadOS |
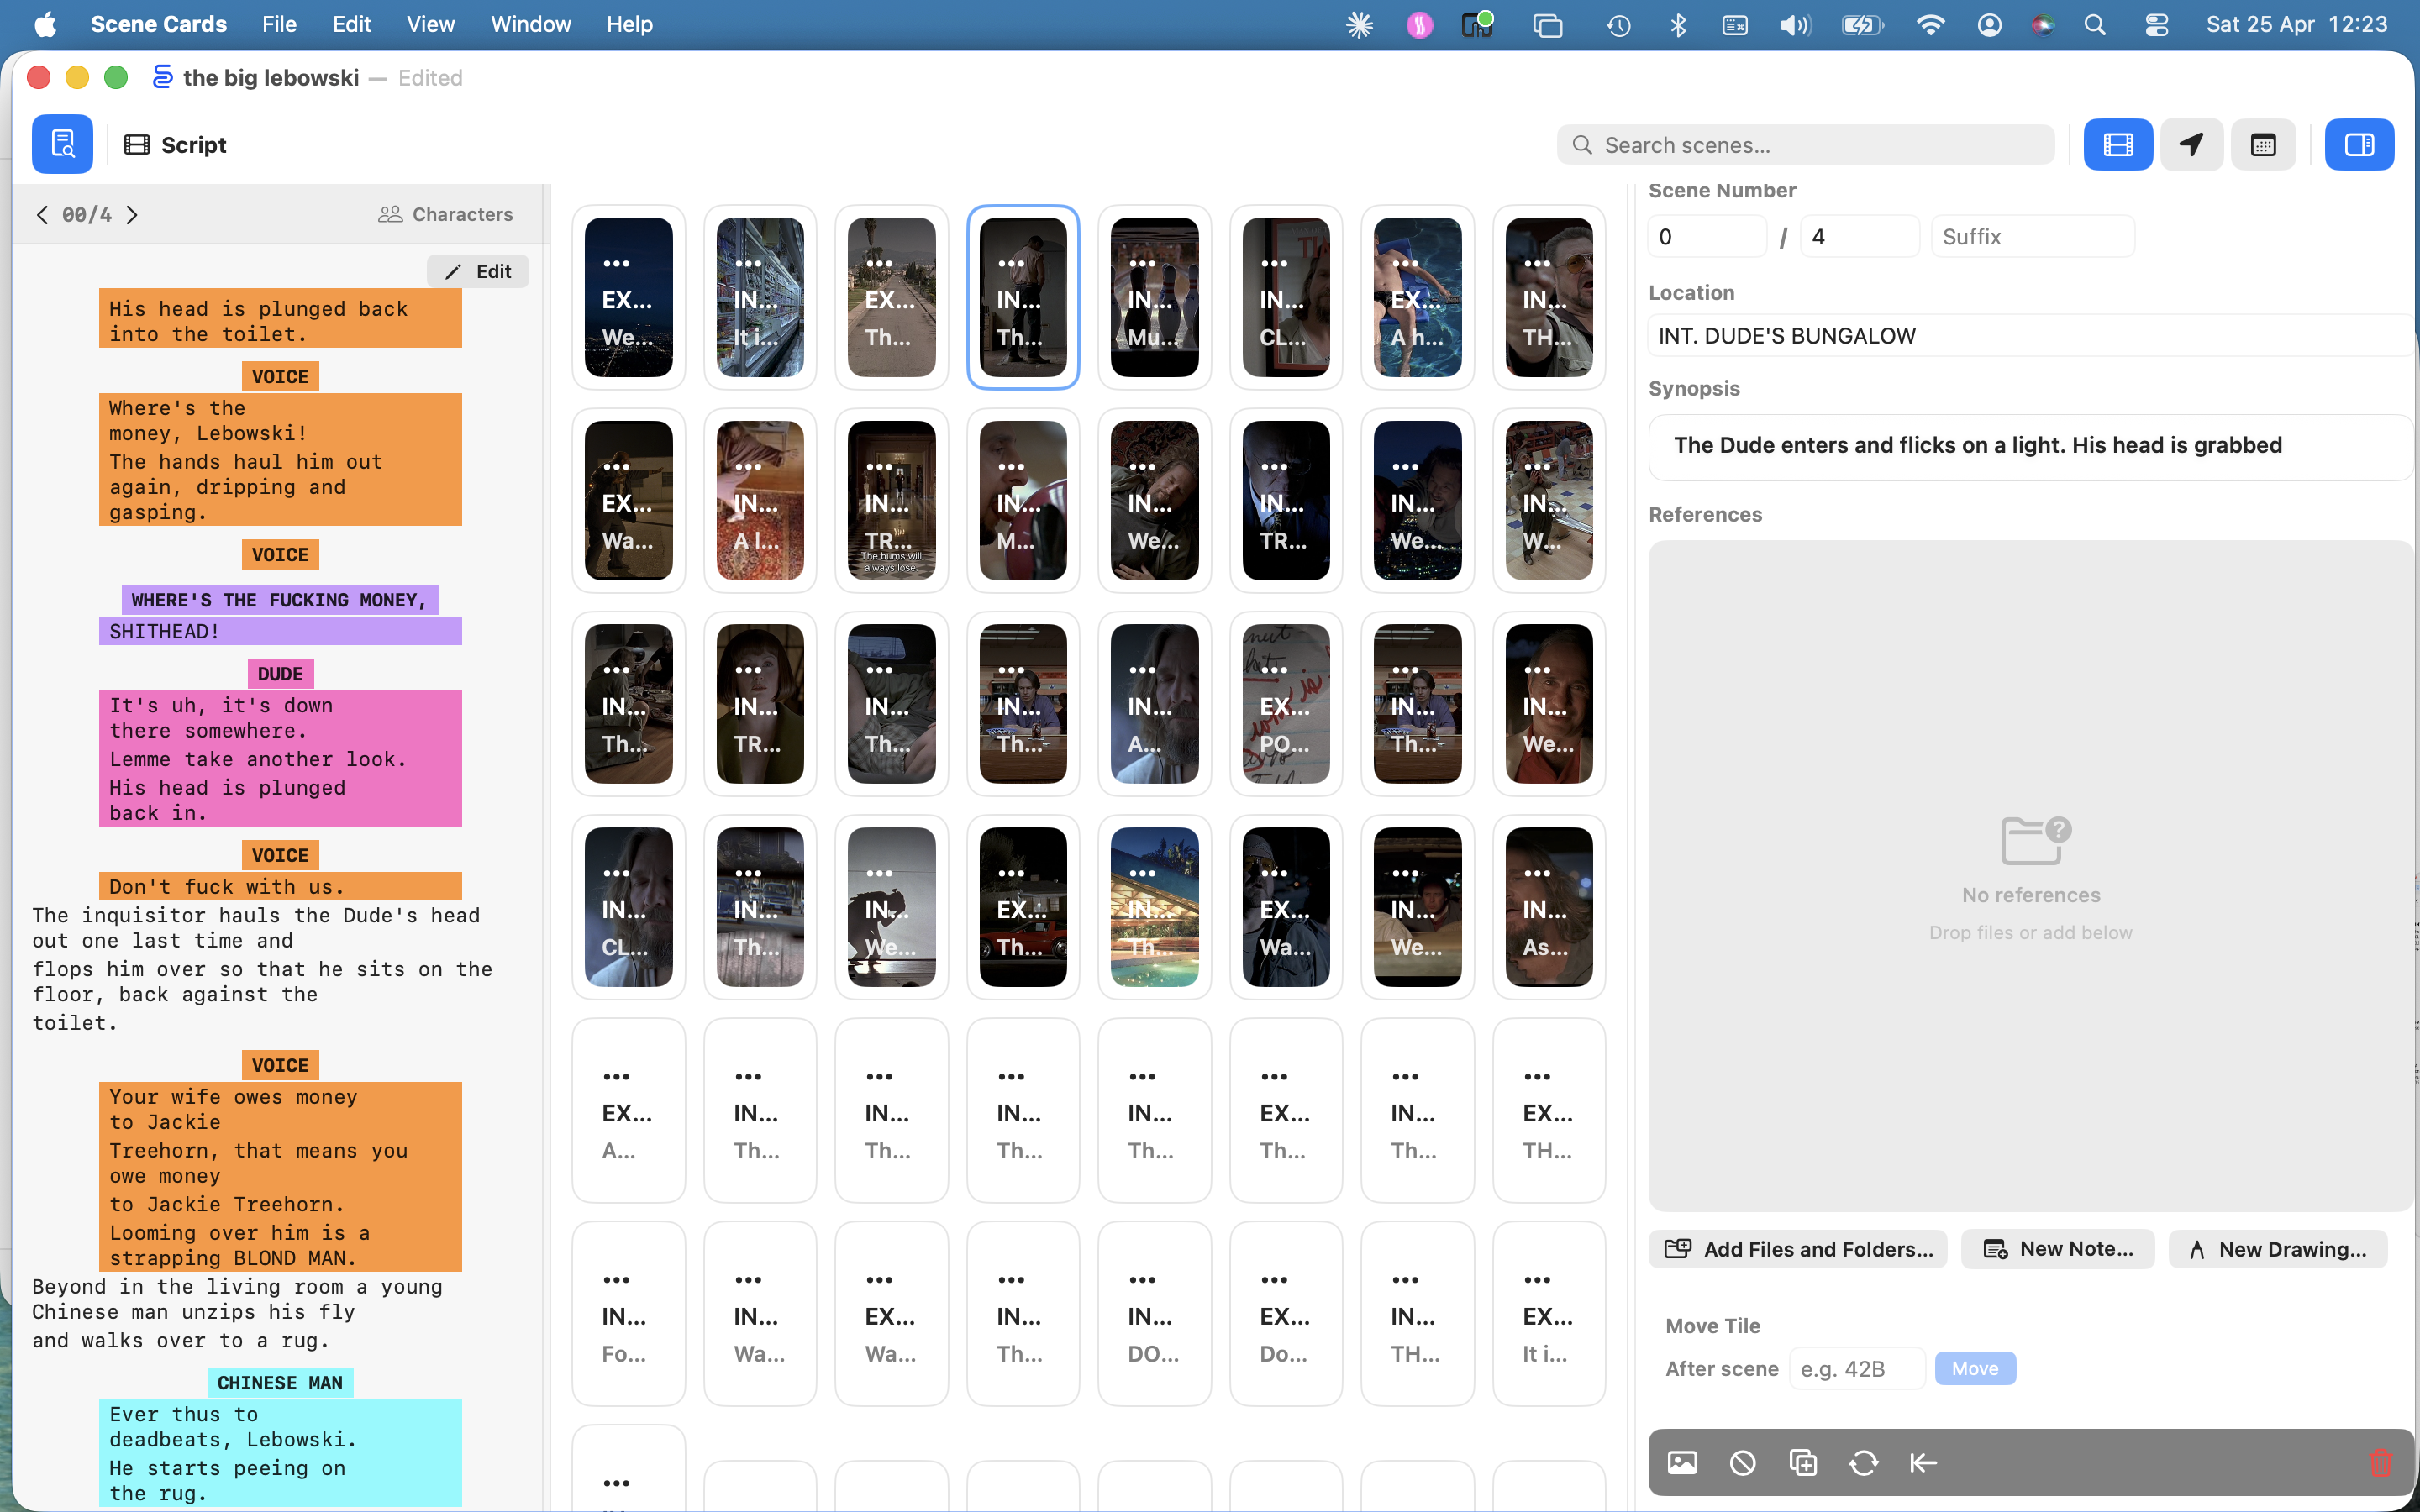
On macOS, the inspector and script panel dock to the right and left of the wall and can be open together. On iPadOS, the inspector opens as a sheet, and the script panel slides up from the bottom of the wall.
ⓘ Note — there is no window-level status bar. The wall’s footer is reserved for future use; today, the card count and import summaries appear as transient overlays where relevant.
3.2 The Wall
The wall is the grid of cards that takes up the centre of the window. Each card represents one scene. The same cards are displayed in all four wall modes, only the grouping changes:
| Mode | Icon | Order | When you use it |
|---|---|---|---|
| Script | film |
Ascending by episode + scene number | Breakdowns, story work, reading through, print scene wall |
| Location | location.fill |
Grouped by location slugline | Scouting, location scheduling, art department planning |
| Schedule | calendar |
Grouped by shoot day (requires a one-liner import) | Daily shoot prep, AD reordering, storing daily reports and essentials |
| Cast | person.2.fill |
Grouped by character | Seeing which scenes a given actor is needed for, at a glance |
Switch modes from the toolbar (§3.3). On macOS the same four modes are
also available from the View menu as ⇧⌘1 / ⇧⌘2 / ⇧⌘3 / ⇧⌘4.
Cast mode is different from the other three in one respect: a scene’s cast isn’t hand-curated data — it’s mostly derived, from up to three sources:
- Dialogue cues — every time you’re in Cast mode, Scene Cards re-scans each scene’s script text for character cues (the same all-caps speaker-name detection used to colour dialogue in the Script Panel, §6.9). This is a best-effort reading of dialogue, not a full cast list, so an occasional stage-direction word can be mistaken for a character name (or vice versa) — and a character who never speaks isn’t picked up this way at all.
- The schedule’s cast list — if a one-liner schedule with a “CAST MEMBERS” page has been imported (§9.4.1), cast numbers 1-100 (the main/speaking-cast band) are resolved to names and matched to their scenes automatically. This is what covers a silent character — someone who’s in scenes per the schedule but never speaks. Matching cast numbers to individual scenes is done by reading the schedule’s cast column by position, which needs a PDF that carries real text. A scanned schedule (one that’s an image of a page, so the scene table can only be read by OCR) won’t fill this in, and Cast mode falls back to dialogue-detected characters only. Reading the cast page is a best-effort parse, same as OCR schedule import, so an occasional name can land on the wrong number — the Hide/Merge tools below fix it the same as a dialogue mis-detection would.
- Manual add — for anything the first two miss, add a character by hand from the Script Panel (§6.9, Add character to this scene…). This is the one piece of Cast-mode data that’s actually stored, scoped to the scene you add it to.
If a name is wrongly detected (from dialogue or from the cast list), open the header menu for the mistaken group and choose Hide from Cast Mode — this uses the same “excluded characters” list as the Script Panel, so hiding a name here also hides it there, and it stays hidden until you re-colour that name in the Script Panel’s character list. A scene with more than one character appears once under each of them, which is expected — it isn’t duplicated on the wall.
Scripts are also often inconsistent about a character’s own name — a
script might cue the same person as both DUDE and THE DUDE in
different scenes, which would otherwise split into two separate columns.
Open the header menu on either one and choose Merge Into…, then pick
the other name — every scene from both folds into a single group from
then on (not just the one card you were looking at). Un-merge in the
same menu reverses it. This mapping is saved with the document.
3.2.1 Wall width
- 🍎 macOS — 8 cards wide by default.
- 📐 iPadOS — 6 cards wide by default. Pinch to change column count.
- 📱 iPhone — 3 cards wide in portrait, 5 in landscape by default. Pinch to change column count. The count resets to the default when you rotate the device; pinch again in the new orientation to adjust.
3.2.2 Card appearance
Each card shows:
- The still image, if one has been attached.
- The scene number and episode in the top-left corner.
- The brief (one-line summary) along the bottom edge.
- A coloured stripe reflecting the revision colour (white, blue, pink, yellow, green, goldenrod…).
- A badge when the scene is omitted or marked as no-shoot.
A card with no still shows a placeholder silhouette and the scene’s slugline instead — it’s a perfectly valid state, not an error.
3.2.3 Empty slots
The wall always shows at least one page of empty slots after the last
populated card. Empty slots let you drag a card into open space or insert
a new scene with File → Insert Tile After (⌥⌘N).
3.3 The Toolbar
3.3.1 🍎 macOS toolbar
Left to right:
[ Script panel ] | [ Mode label ] [ Search ] | [ Script | Loc | Sched | Cast ] | [ Inspector ]
- Script panel toggle (
doc.text.magnifyingglass) — opens or closes the script panel on the left. Highlighted blue when open. - Mode label — the name and icon of the current wall mode. This is a label only; to change mode, use the mode buttons on the right.
- Search field — filters the wall live as you type. Matches against
scene number, brief, description, comments and
episode/scenesyntax (see §3.3.3). - Mode buttons — one button per wall mode. The active mode is tinted with the accent colour.
- Inspector toggle (
sidebar.right) — opens or closes the inspector panel on the right. Highlighted blue when open.
✱ Tip — hover over any toolbar button to see a tooltip describing what it does.
3.3.2 📐📱 iPadOS and iPhone toolbar
Left to right:
[ ← Back ] [ Script panel ] [ ··· ] [ 🔍 Search ] [ mode ] [ Inspector ]
- Back (
chevron.backward) — returns to the Files browser. The document saves on the way out. - Script panel toggle (
doc.text.magnifyingglass) — opens the script panel at the bottom of the wall. Tap it again, tap the panel’s ✕, or swipe the panel’s handle down to close it. - Overflow menu (
···) — houses actions that live in macOS menus:- Undo
- Import Script PDF or FDX…
- Open Project…
- Import Images from Files…
- Import from Photos…
- Import Shoot Reports…
- Print…
- Search — starts as a magnifying-glass button; tap to expand into a full text field, tap the ✕ (or submit) to collapse. The icon turns blue while a query is active.
- Mode button(s)
- 📐 iPad — four individual buttons, one per mode. The active mode is tinted with the accent colour.
- 📱 iPhone — a single button showing the current mode’s icon. Tap it to open a menu and select Script, Locations, Schedule or Cast.
- Inspector toggle — opens the inspector as a sheet.
ⓘ Note — neither iPadOS nor iPhone has a menu bar, so all actions are reachable from the toolbar or the overflow menu. (Schedule mode also attaches a context menu to each card for day-assignment actions — see §9.)
3.3.3 Searching
The search field is live — results update as you type. Matching rules:
| You type | Interpreted as |
|---|---|
beach |
Text match against brief, description, comments and scene numbers |
15/ |
Every card in episode 15 (any scene) |
15/36 |
Episode 15, scene 36 — prefix match, so 1/1 also matches 1/10, 1/11, etc. |
42 |
Any scene whose number, brief or description contains 42 |
Clear the query with the ✕ button in the field. The wall restores its full contents immediately.
3.4 The Inspector Panel
The inspector is the right-hand pane (or sheet) where you edit one card at a time. It only shows content when a single card is selected.
Open it from the toolbar’s inspector button (§3.3) or by double-clicking (macOS) / double-tapping (iPadOS) a card.
Fields, top to bottom:
- Scene Number — three fields: Episode / Scene / Suffix.
- Location — the slugline; auto-uppercased.
- Action — free-form notes on the scene.
- References — carousel of attached reference files.
- Move Tile — reposition this card after another scene by number.
- Toolbar strip — Import Image, Remove Image, Omit/Unomit, Insert After, Renumber From Here, Close Gap, Delete.
- Shoot Data — sound / camera / continuity entries, shown only when they exist.
A full walkthrough of each field lives in §6 Working with Scenes.
ⓘ Note — script-derived values (scene heading, revision colour, raw script text) come from the import and are not edited from the inspector. Day-level shoot reports (call sheets, camera, continuity, essentials) live in Schedule mode alongside each shoot day — see §10.
3.4.1 Closing the inspector
- 🍎 macOS — click the inspector button in the toolbar to toggle it closed. It stays closed for subsequent documents until you reopen it.
- 📐 iPadOS — swipe the sheet down, or tap the inspector button again.
3.5 The Script Panel
The script panel is the left-hand pane (macOS) or a sheet (iPadOS) that shows the raw script text for the currently selected card. It recognises and formats:
- Scene headings (sluglines)
- Character cues
- Dialogue blocks
- Action paragraphs
Characters have per-document colour assignments. Where a name has a colour (either automatic or manually set — see §6.3), that colour is applied to the character cue so you can scan dialogue-heavy scenes at a glance.
Click or tap a character name in the script panel to open the colour assignment popover for that character.
✱ Tip — the script panel follows your wall selection. Click another card and the script updates; click nothing and the panel shows a brief placeholder.
On 📐📱 iPadOS and iPhone, the panel slides up from the bottom of the wall. Drag the handle at its top edge to resize it — up to the full height of the wall area. To close it, do any of the following:
- tap the ✕ at the right end of the handle bar,
- swipe the handle down past the panel’s minimum height, or
- tap the 🔍 toolbar button again.
The panel’s Edit button switches to an editable view: the script text itself, plus pinned Scene Heading and Action rows that edit the card’s fields directly (§6.4.1). Scene Cards is still not a screenwriting tool — for a proper revision, re-import the new draft — but quick corrections and card metadata edits happen right here.
3.5.1 Auto-scroll (teleprompter)
The script panel has a built-in teleprompter so you can read through a scene hands-free during prep or on-set.
| Control | What it does |
|---|---|
| ▶ / ⏸ button | Start or pause auto-scroll |
| Tap anywhere on the script | Toggle play / pause — same as a video player |
| Drag the script during play | Pauses immediately; scroll to a new position, then tap or press ▶ to resume from there |
| Delay slider | Countdown before scrolling begins (0–20 s) |
| Speed slider | Scroll rate (0.3 × – 5.0 ×) |
The countdown is displayed inside the play button (12… 11… 1) and the button turns orange while the scroller is active. Pressing ▶ again during the countdown cancels it.
✱ Tip — set a 3–5 s delay and a comfortable speed before your first read-through. Both settings persist across scenes for the session.
3.5.2 When the script panel is useful
- Reading a single scene in full while reviewing the card’s still and references.
- Hands-free scene read-through using auto-scroll during rehearsal or prep.
- Quickly checking which characters appear in a scene before assigning colours.
- Spot-checking a parser import — if a scene’s text looks wrong, re-import from a cleaner PDF (see §5.1).
3.6 Selecting, Zooming and Scrolling
3.6.1 Selection
- Single click / tap — selects one card. The card gets a blue border.
- ⇧ click (macOS) — extends the selection to include a range.
- ⌘ click (macOS) — toggles individual cards in and out of the – this is not working like this at the moment but maybe it should as is more standard for shift click range and Apple click selection - needs looking at— selection. The anchor card shows a blue count badge.
- Double-click / double-tap — opens the inspector for the card.
- Long-press (📐 iPadOS) — picks the card up for drag-to-reorder in Script and Location mode. In Schedule mode a long-press opens the day-assignment menu — see §9.
- Drag (🍎 macOS) — click and hold, then drag to reorder.
Scene Cards does not ship a right-click / context menu on plain wall cards.
Scene-level actions (Insert Tile After, Toggle OMITTED,
Renumber From Here, delete) are reached through the inspector’s
toolbar, the Edit menu on macOS, or the keyboard shortcuts listed in
§16.
Most wall-wide operations (changing revision colour, bulk omit, bulk delete) apply to every card in the current selection.
ⓘ Note — the Schedule mode has its own selection semantics tied to day blocks rather than individual cards. See §9 Scheduling.
3.6.2 Zooming
- 🍎 macOS — adjust wall width via
View → Wall Width(see §17.2). A, - i’m not sure we have this— trackpad pinch is not currently mapped to column count on macOS. - 📐 iPadOS — pinch the wall with two fingers. Pinch outward to pack more cards per row; pinch inward to make each card larger. The column count animates live and persists until you rotate the device.
- 📱 iPhone — same pinch gesture. The column count persists until you rotate; rotating resets to the orientation default (3 portrait, 5 landscape), after which you can pinch again to adjust.
3.6.3 Scrolling
- 🍎 macOS — standard scroll wheel or trackpad two-finger gesture.
- 📐 iPadOS — standard swipe. Cards lazy-load as they come into view, so very long walls stay responsive.
When you switch wall modes, Scene Cards scrolls the new view to the currently selected card automatically, so you don’t lose your place moving between Script, Location and Schedule. If no card is selected, the new mode opens at the top.
3.7 Where to Go Next
- Organise the wall — see §5 Building the Wall.
- Fields inside the inspector — see §6 Working with Scenes.
- Keyboard shortcuts reference — see §16.
- Toolbar and menu reference — see §15.